Introduction
support section

Outline
The data (values/times) of the equipment collected by IoT Data Share on the PC
is stored in Microsoft SQL Server of the database server.
![[System architecture]IoT Data Share →(Ethernet)→ Microsoft SQL Server Robot, Robot Controller →(Ethernet)→ IoT Data Share](../../assets/images/s1_c/contents_0001/contents_0001_overview.png)
Equipment information of the connection destination
- Controller name : RC8
- Item name : I10
Database information of the connection destination.
* To connect IoT Data Share to the equipment, use the settings in
Chapter 1, Lesson2 of <Learning contents> [Basics].
- Type : Microsoft SQL Server
- IP address : 192.168.1.10
- Database name : IoTDB
- User name : IoTDBUser
- Password : dnSQLP@ss
- Table name : dbo.Table1
- Column1 (Column name) : Item_value
- Column1 (Data type) : int
- Column2 (Column name) : Item_datetime
- Column2 (Data type) : date
The following configuration procedure assumes that a connection between the PC and the database server
has been already established.
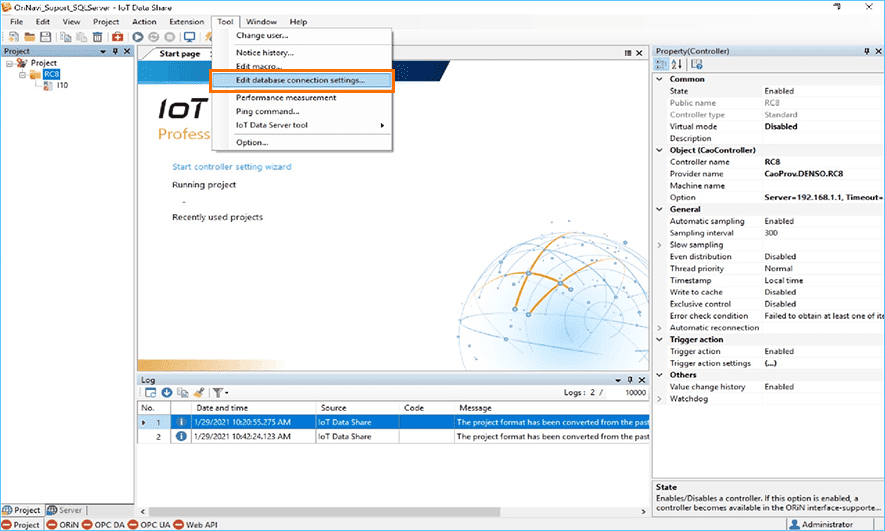
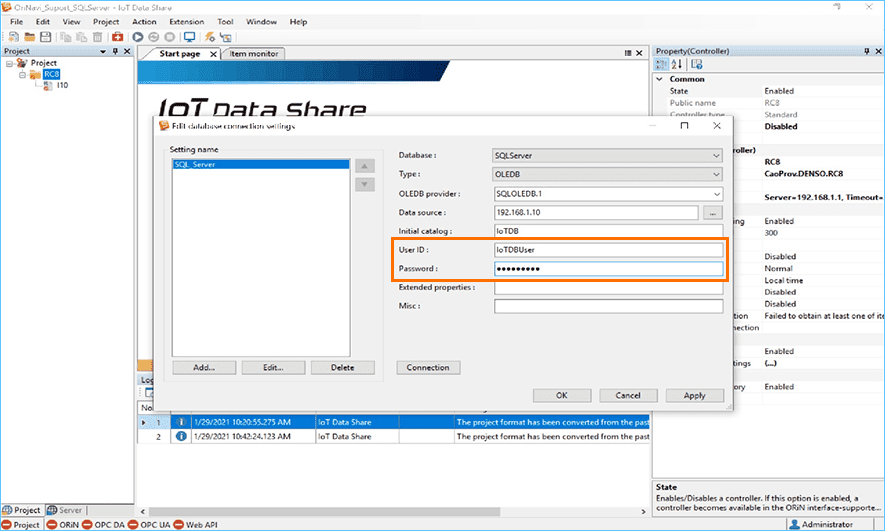
Step 1Registering database connection information
Register connection information to connect to the database.
 Select [Edit database connection settings] from the [Tool] menu.
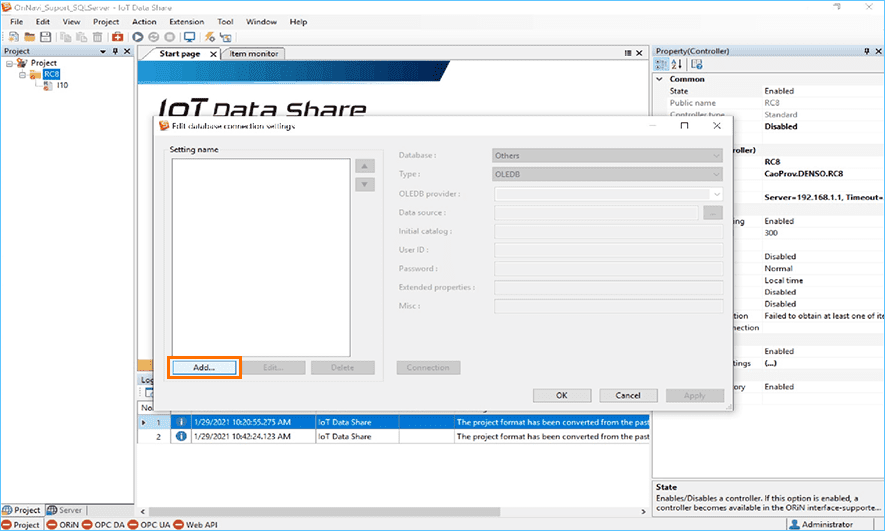
 Click the [Add] button in [Setting name].
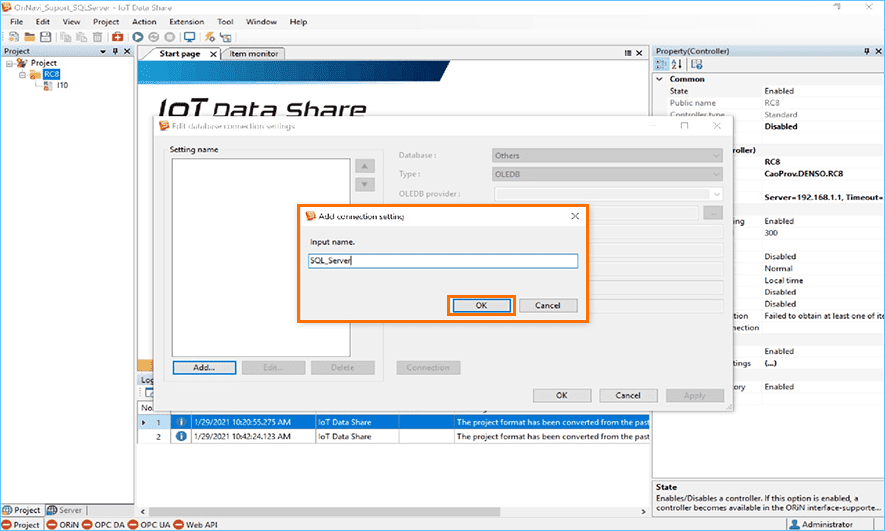
 Optionally set the setting name.
Here, enter "SQL Server" and click [OK].
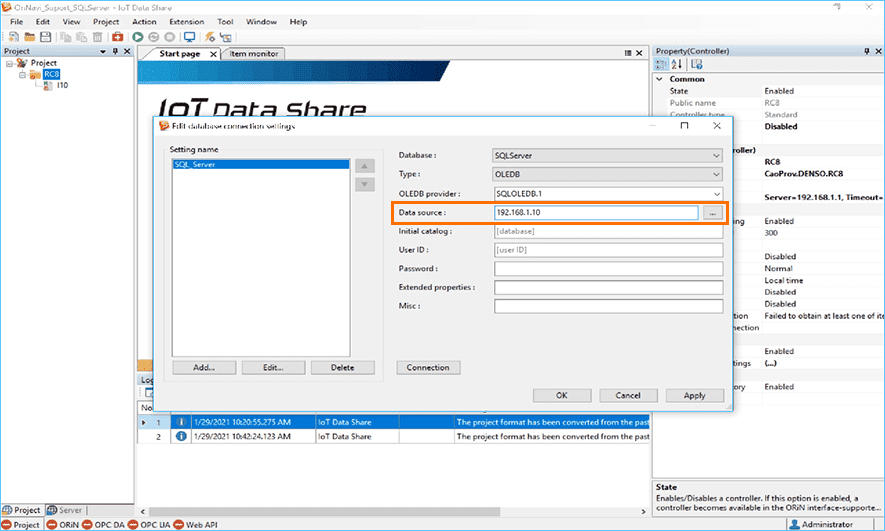
 Select "SQL Server" from the list of items in [Database].
* "OLEDB" is selected for [Type], and "SQLOLEDB 1" is selected for [OLEDB provider].

 Set the IP-address of the access point to [Data source] as desired.
Here, enter the IP address "192.168.1.10".
 Set [Initial catalog] to the desired databasename to connect to.
Here, enter the databasename "IoTDB".

 Set [User ID] and [Password].
Here, enter the user ID "IoTDBUser" and password "dnSQLP@ss" defined
in SQL Server.
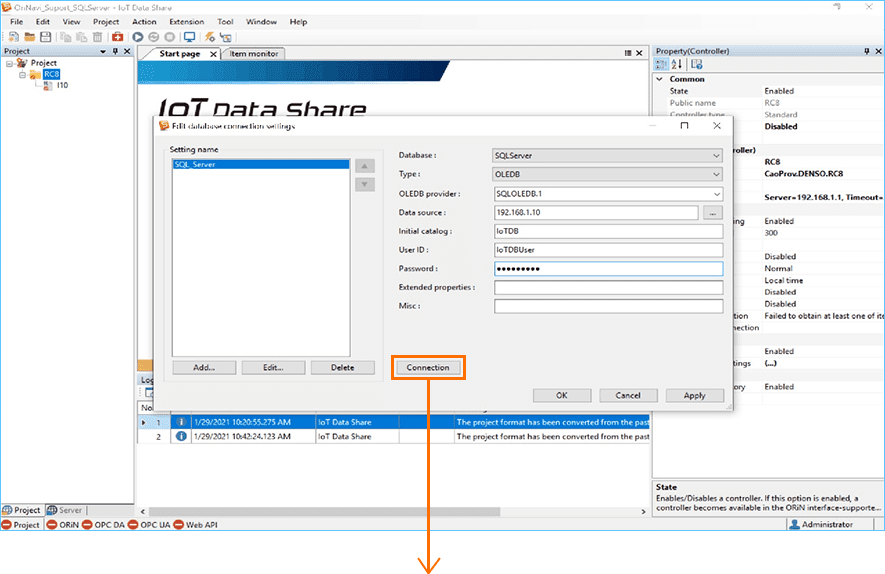
 Click the [Connection] button.
* Confirm the connection with the database.
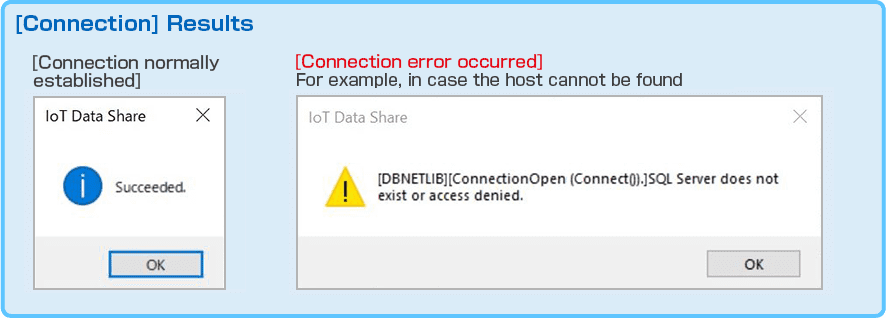
Note
Typical examples of database connection errors
- Cannot find a host.
- The IP of the access point is wrong.
- Host name is wrong.
- The user name and password are wrong.
etc.
 Click the [OK] button.
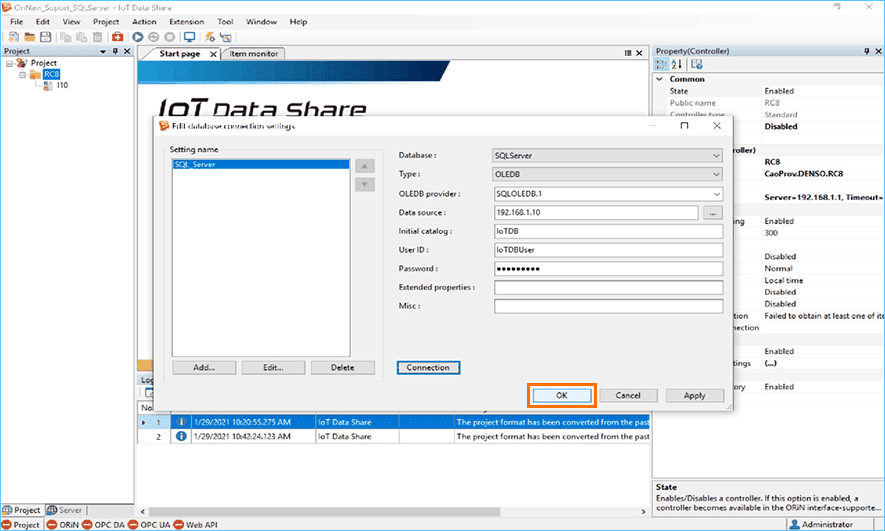
This completes "Registering database connection information".
Step 2Setting up data insertion to a SQL Server using trigger actions
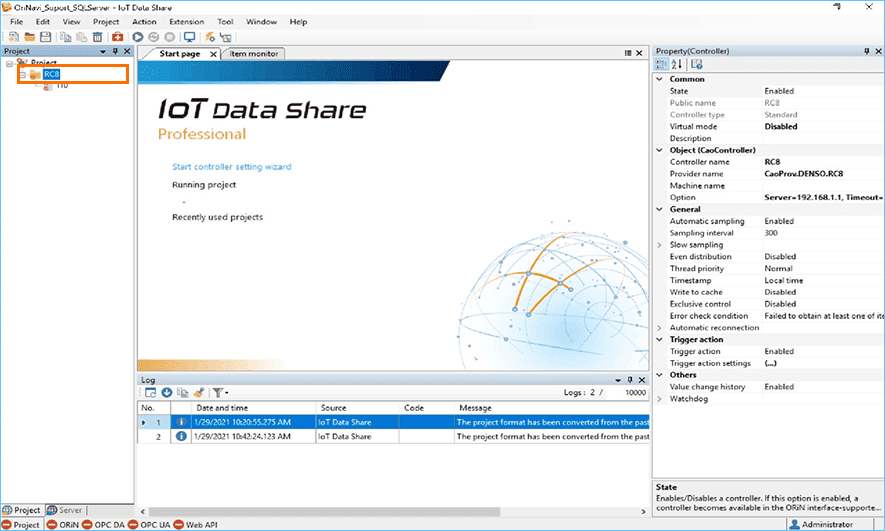
Select a controller to which you want to add the trigger action.
Select [Trigger action setting] from the right-click menu.
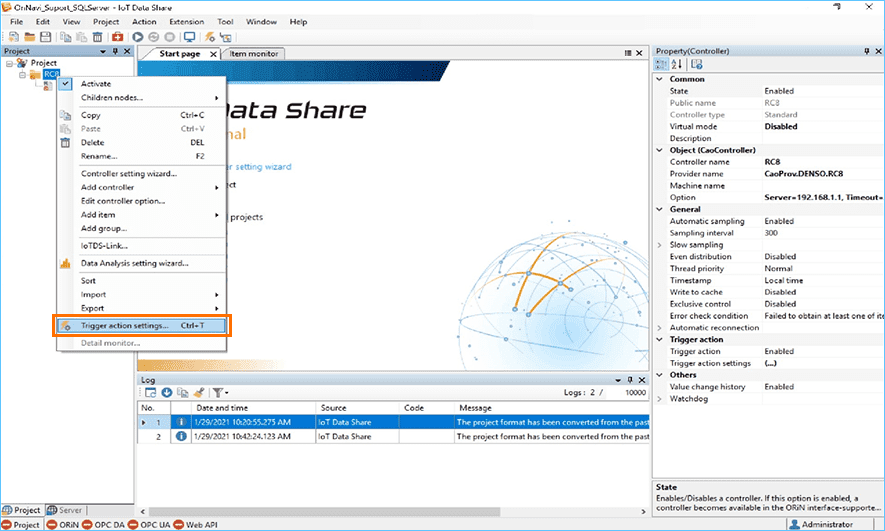
Note
In addition to the right-click menu,
you can also select the trigger action settings from the toolbar buttons.
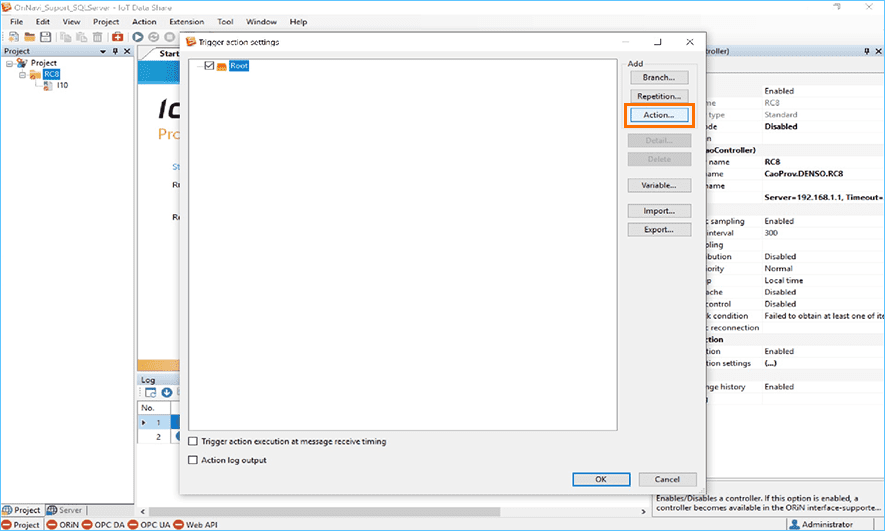
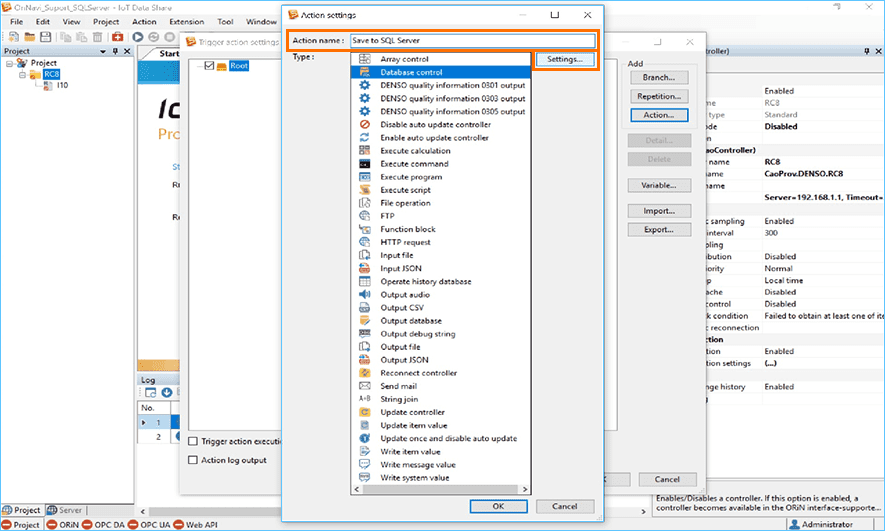
Click the [Action] button.
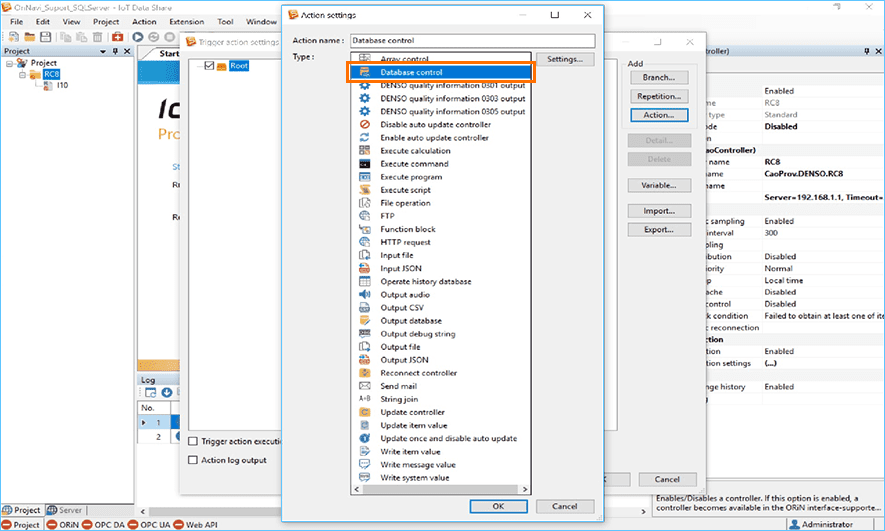
Select [Database control] from the action list.
Set [Action name] as desired.
Here, enter "Save to SQLServer" and click the [Settings] button.
Note 1
When adding a trigger action, you can leave the action name as the default, but if you add multiple actions of the same type, they will have the same action name, so it is recommended to change it to any name you want.
Note 2
You can also open the settings screen for each action by double-clicking the selected action.
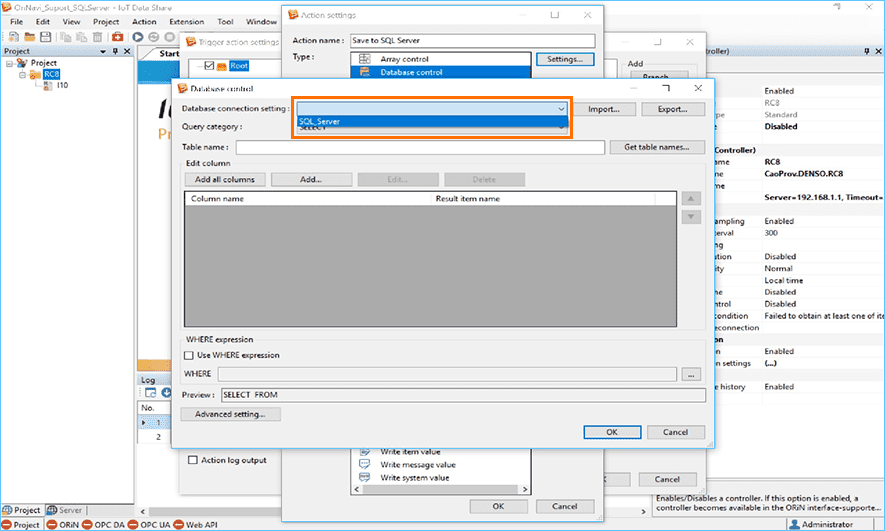
Select the database connection information registered in Step1 "SQL Server"
from the [Database connection settings] list.
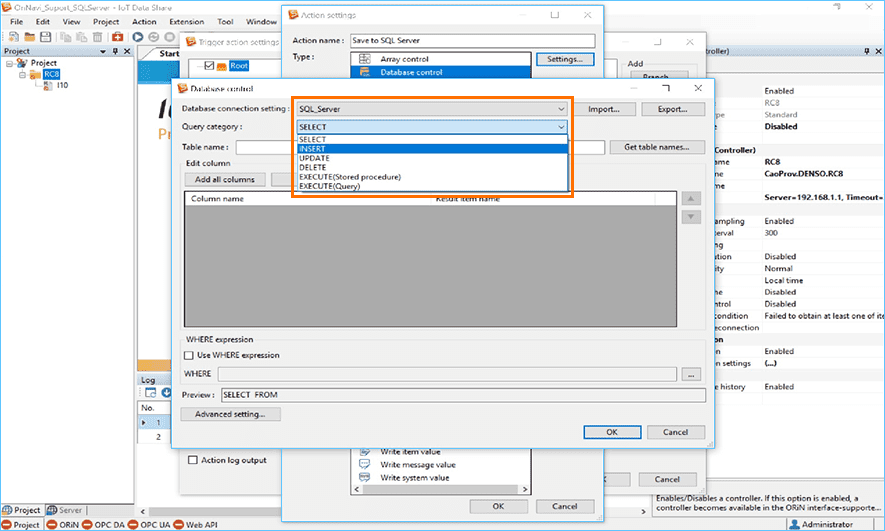
Select [INSERT] from the [Query category] list.
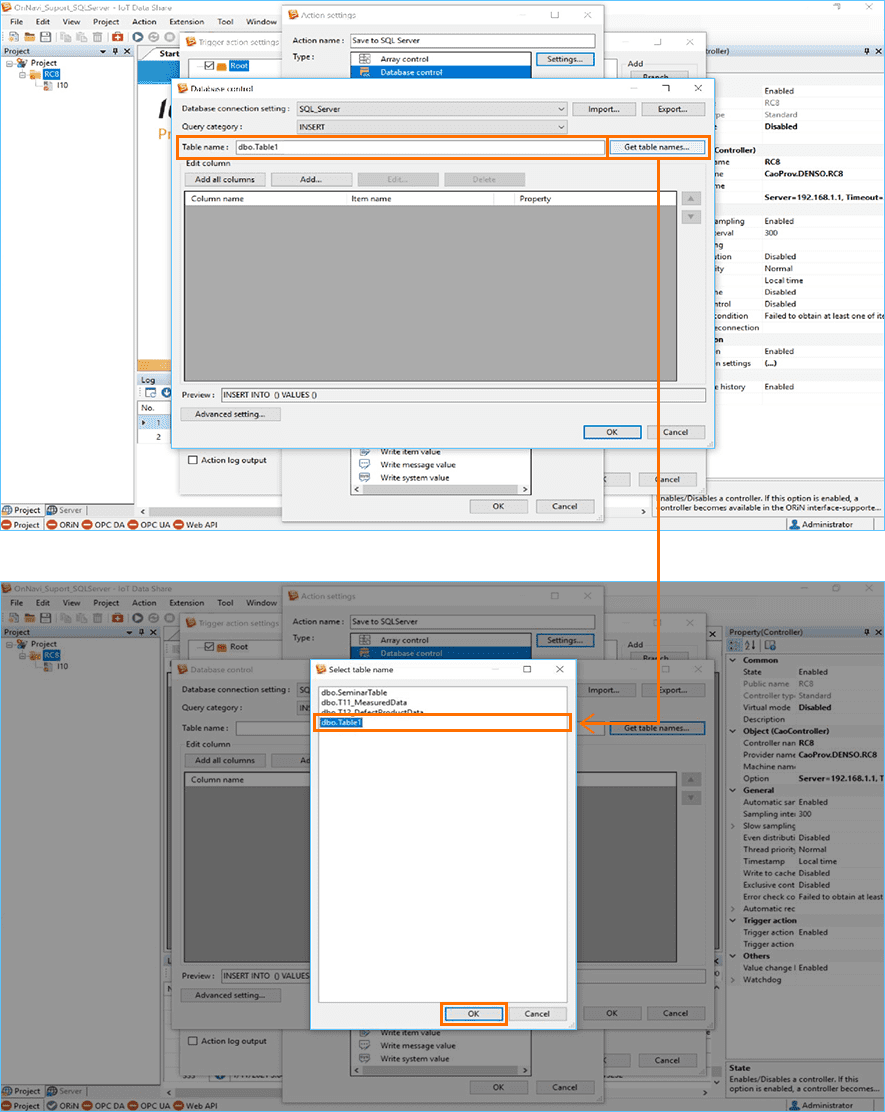
Set the [Table name].
Click the [Get table names] button. Select the table name "dbo. Table1"
from the displayed list.
Note 1
Click the [Get table names] button to connect to the database server and obtain the name of the defined table and display it in the list.
Note 2
You can also enter the name directly in [Table name].
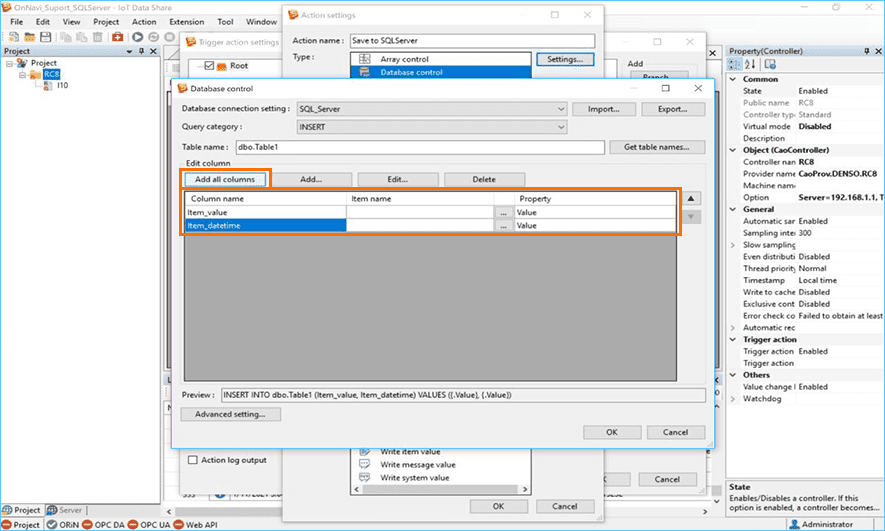
Click the [Add all columns] button.
The columns "Item_value" and "Item_datetime" are added to "dbo.Table1".
Note
You can add any column with the [Add] button or delete unnecessary columns with the [Delete] button.
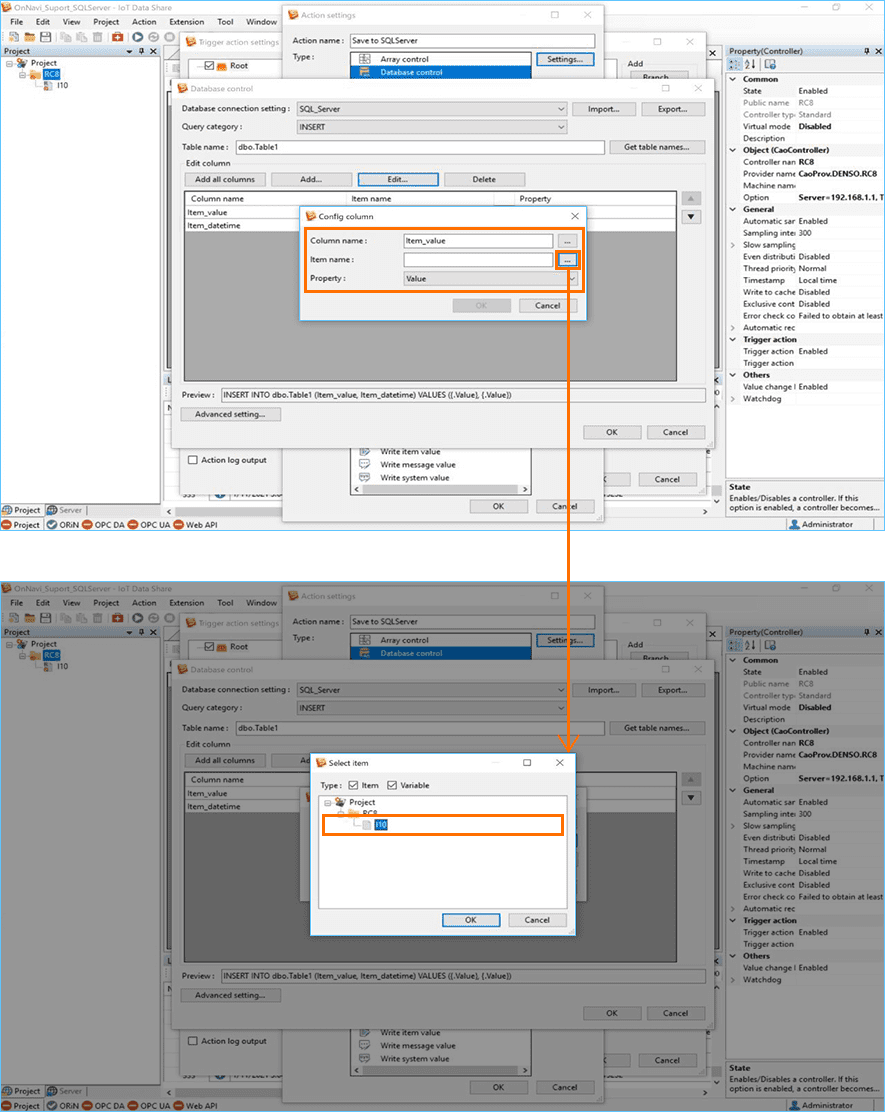
 Select the column "Item_value", and click the [Edit] button.

Note
You can also set items by clicking the [...] button next to [Item name].
 Click the [...] button of [Item name], and select the item "I10" from the displayed tree.
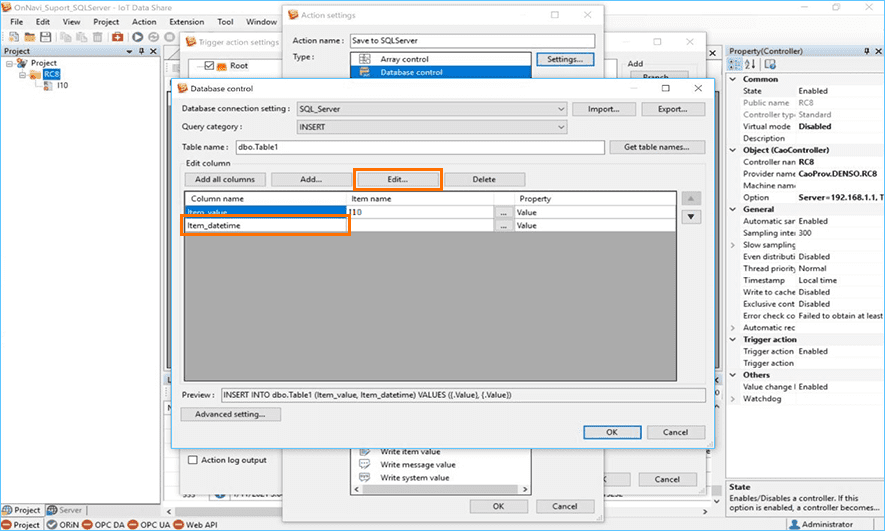
Select "Value" from the [Property] list.
Note
The data type of the selected item may not be saved unless the data type of the database column matches the data type of the column.
In such a case, an error will not occur at the time of setting. However, if the project is started as it is, an error will occur at the time of execution.
 Select the column "Item_datetime", and click the [Edit] button.
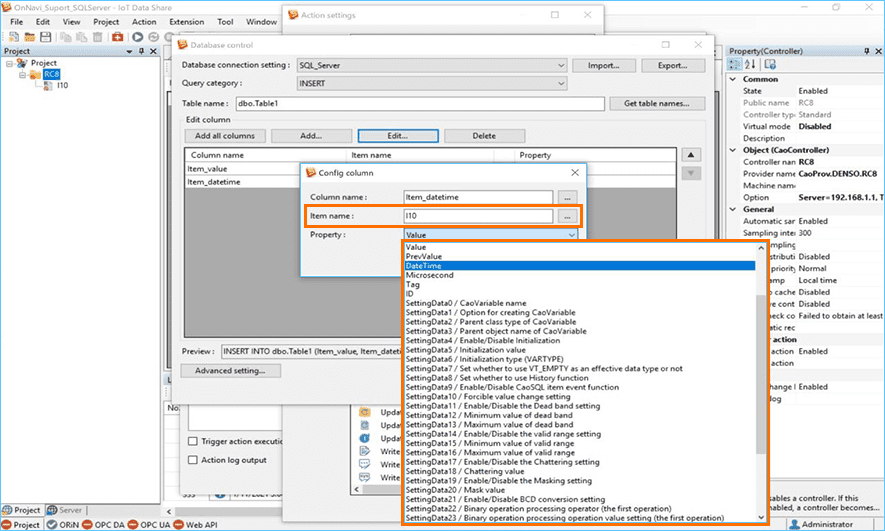
 Click the [...] button of [Item name], and select the item "I10" from the displayed tree.
Select "DateTime" from the [Property] list.
 Click the [OK] button.
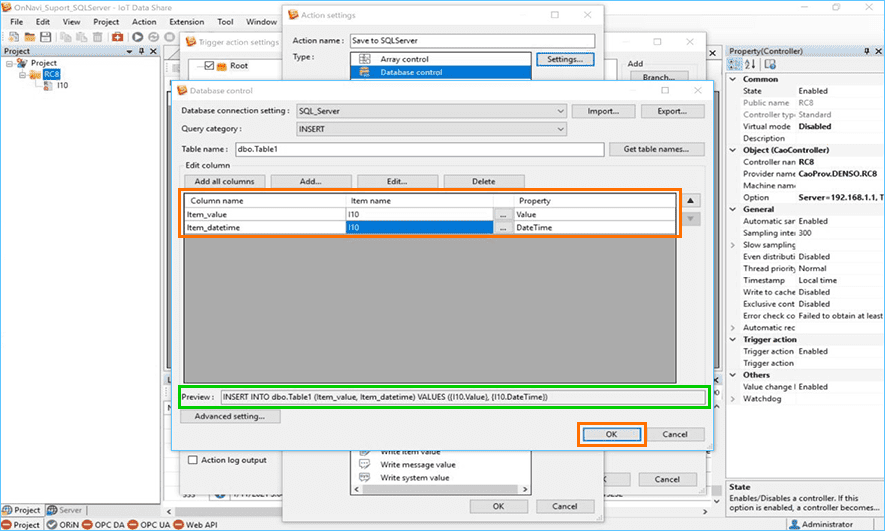
Note
You can check the SQL query from [Preview] at the bottom of the setting.
However, the data below "VALUES{...}" is replaced by the value at runtime and cannot be viewed in the preview.
 Click the [OK] button.
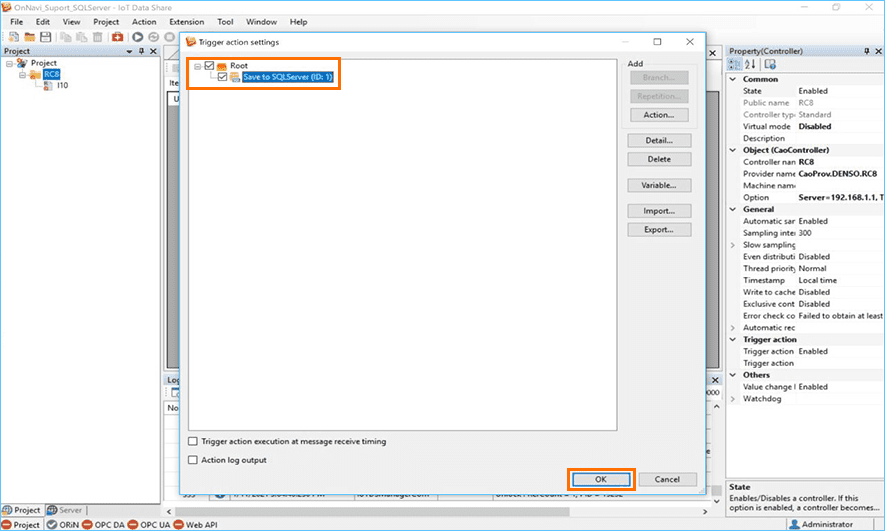
This completes "Setting up data insertion to a SQL Server using trigger actions".
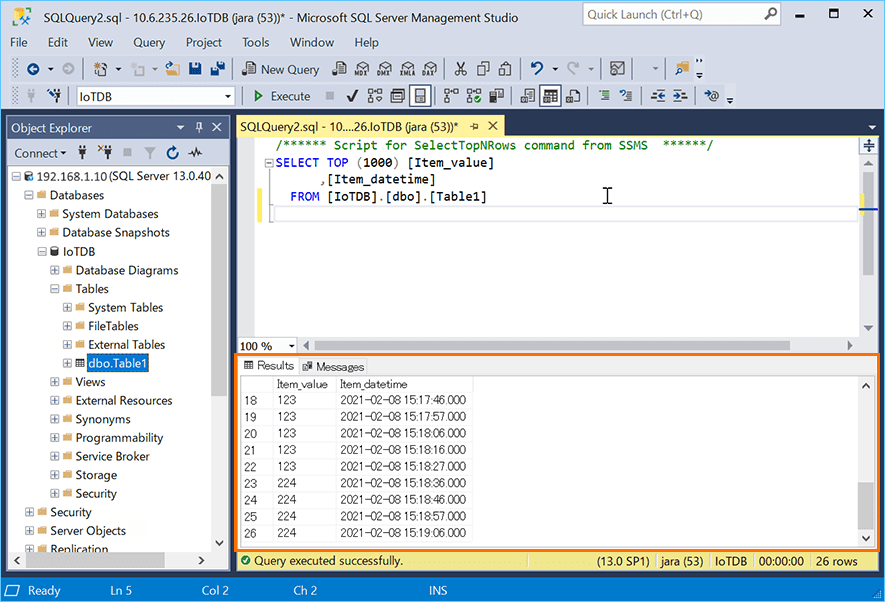
Step 3Verifying data stored on the database server
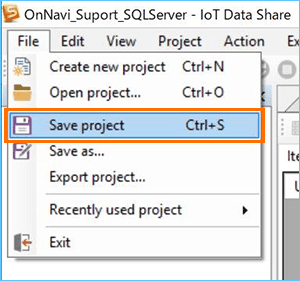
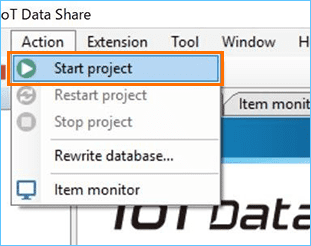
* For details on how to save and start a project, refer to Chapter 1 Lesson2 of <Learning contents> [Basics]
Select [Save project] from the [File] menu.
Select [Start project] from the [Action] menu.
Verify that the datais stored in a Microsoft SQL Server on the database server.
* Here, Microsoft SQL Server Management Studio is used to verify the data.
●This completes the "How to save data to Microsoft SQL Server" procedure.